Kerberos Authentication Technology Simplified.

Kerberos is the native authentication protocol in Microsoft Active Directory, which works on the basis of tickets to allow clients communicating over the network to prove their identity to one another in a secure manner. Kerberos protocol is designed to protect messages against eavesdropping and replay attacks.

Kerberos authentication protocol is built on symmetric key cryptography which uses same keys for both encryption and decryption.  Kerberos authentication requires a trusted third party (an Active Directory server) during certain phases of authentication. By default Kerberos uses TCP port 88 for communication.

As mentioned earlier, Kerberos authentication will have 3 parties client (user), resource (File Server) and a trusted third party (Active Directory). Key distribution Server in Active Directory network is its Domain Controller.

Three parties required for Kerberos authentication

Three parties required for Kerberos authentication

In Kerberos, the Key Distribution Center (KDC) does not communicate directly with the resource server. Due to this reason majority of the processing burden in authentication is handled by the client.

The authentication process kicks off once the client attempts to logo on to the network. The client creates a small package called an authenticator, with information including the date and time so that it can track the authenticity and eliminate any hacker attempt to replay on the network.

Client creates authenticator and encrypt using user password

Client creates authenticator and encrypt using user password

Authenticator package is encrypted using user password and it also has a small portion unencrypted where the user name and source address information are stored. The username in the unencrypted portion of authenticator package allows the KDC or Domain Controller to identify who is trying to authenticate.

Using the user password (which is only known to the user) as an encryption key emphasize the fact that Kerberos does not transmit password in plain text.

Client sends the authenticator package to Domain Controller

Client sends the authenticator package to Domain Controller

When the authenticator package is sent off to the Domain Controller, it identifies the user name and looks up the Active Directory database to pick the user password.  The Domain Controller then uses the user password stored in the Active Directory to decrypt the authenticator.  If the Domain Controller could not decrypt the authenticator, the logon attempt is denied. If the Domain Controller can successfully decrypt the authenticator, it identifies that the user is the same user who claims who they are because the secret password is correct

Domain Controller issues Ticket Granting Ticket, encrypt using its private key

Domain Controller issues Ticket Granting Ticket, encrypt using its private key

At this point, since the user is authenticated to the Active Directory, it does not require authenticator package anymore so it is simply discarded.  In order to avoid the user to authenticate every time the user communicate to the Domain Controller, it issues a Ticket Granting Ticket (TGT) which contains all the information the Domain Controller has related to the authenticated user and encrypt it using a key that only the Active Directory knows.

Client receives Ticket Granting Ticket from Domain Controller and place it to Kerberos Tray

Client receives Ticket Granting Ticket from Domain Controller and place it to Kerberos Tray

Domain Controller transmits the TGT to the client (user machine) and that will be stored in a special memory area called “Kerberos Tray”. Since the Kerberos tray always lives in the memory which cannot be swapped out to the disk, whenever the client machine crashes or powered off, you need to authenticate again.

Client sends a copy of Ticket Granting Ticket to Domain Controller along with File Server access request

Client sends a copy of Ticket Granting Ticket to Domain Controller along with File Server access request

Once authenticated to the network, whenever the user want to get some information from a file server, the client system looks for its ticket in the Kerberos try. If it does not find any valid ticket for file servers in the kerbros tray, it must go back to the KDC to get a valid key for the file server. For that purpose, instead of going through the whole authentication process again, the client system simply sends the TGT back to the KDC along with a request to access the File server.

The KDC (Domain Controller) does not have to verify the user information, instead it just decrypts the TGT and verifies that it is the same ticket which was encrypted using its own secret key. By default the TGT has a life period of eight hours, periodically they have to be destroyed and renewed so that Active Directory can revalidate the user identity.
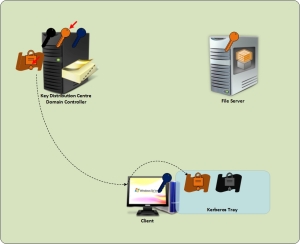
Domain Controller generates ticket and encrypt using File Server’s logon password and sends to the client.

Domain Controller generates ticket and encrypt using File Server’s logon password and sends to the client.

Domain Controller now generates a new ticket and encrypt using the file server’s logon password stored in the Active Directory database and then send to the requested client which later stores it to the Kerberos tray.

Client sends the access ticket to File Server and Files Server decrypts the ticket using its logon password.

Client sends the access ticket to File Server and Files Server decrypts the ticket using its logon password.

For the next eight hours when the client wants to access file server, it just sends a copy of the ticket to file server. The file server tries to decrypt the ticket with its logon password, if it is able to successfully decrypt the ticket, then that ticket must be issued by the KDC because that is the only one has the file server’s login password known.

By decrypting the ticket using own logon password, the file server understands that this is a legitimate ticket. The file server then opens the ticket which has the client’s username, group membership etc, and it uses that information to provide access to the resources within the file server.

Every time the client wants to access the resource from file server, it has to submit a valid ticket along with the request. The file server does not store any client authentication tickets in its memory because it has to serve thousands of user request simultaneously.

Now let us do some practical test.

You can use klist command to display the content of Kerberos tray within the client system. Below TechNet link will provide more details of the parameters can be used along with the klist command. http://technet.microsoft.com/en-us/library/hh134826.aspx

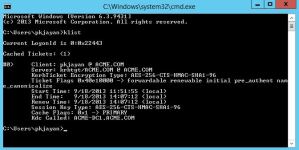
In order to lookup the Kerberos tray in your client system, go to command prompt and type klist.

List of current Kerberos tickets in the system

List of current Kerberos tickets in the system

The klist command will displays the list of currently cached Kerberos tickets in the system. Notice that the Kerberos tray currently has only TGT ticket. The listing will show you the details of the Client name, Service name, encryption type that is used to encrypt the Kerberos ticket, time stamp etc.

Client accessing file share

Client accessing file share

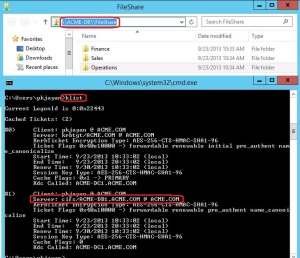
Go to the command prompt and try to access file share on a file server (I have a folder shared on my database server in my lab). Once the file share is connected, rerun the klist command.

List of Kerberos tickets in the Kerberos tray while accessing file server

List of Kerberos tickets in the Kerberos tray while accessing file server

Notice that the command now lists one additional ticket which is belongs to the file server (in our case the database server ACME-DB1.ACME.COM).

Fine-Grained Password Policy using Windows Server 2012.

In the past, there was a time when Active Directory was restricted with a single password policy per domain. As and when the requirement for having different password policies for different group of users (multi tenancy and isolation of security domains) within the organization become inevitable, Microsoft decided to fine-grain the password policy so that the administrators could deploy more than one password policy within a single domain.

Even though Microsoft introduced the fine grained password policies in windows server 2008, the configuration was not user friendly. Windows server 2012 came with a truly user-friendly graphical user interface tool that makes it very easy to deploy a fine-grained password policy.

Defining the security requirements

Before configuring fine-grained password policies, the organizational security structure should be defined clearly by creating necessary groups.  Consider that your organization requires a separate password policy for the domain administrators, service accounts and normal users.

Let us take this typical use case scenario as our example where the organization will have three different password policies:

  • A high security password policy for domain administrators with strict settings for passwords expire, complexity and so on
  • A low security user password policy with a setting that is not strict for passwords expire, complexity etc…
  • A service account password policy targeted at service accounts with a strict settings for minimum password length complexity etc…

In order to configure fine-grained password policy, go to Windows Server 2012 Server Manager, select Active Directory Administrative Center from the Tools menu.

FGPP-1

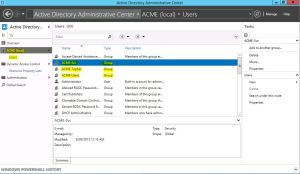
From the List View in Active Directory Administrative Center, select Users and verify that the security group exists and its membership is correct. In our scenario, we have ACME-Svc, ACME-Admin and ACME-Users groups.

FGPP-2

To create the FGPP, switch to the Tree View in Active Directory Administrative Center and navigate to System > Password Settings Container.

FGPP-3

Click on  New and then select Password Settings.

FGPP-4

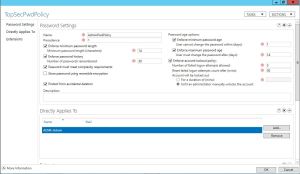
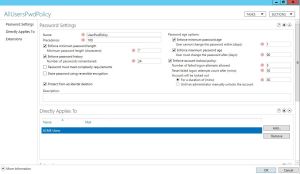
In the Create Password Settings windows, you can specify all the familiar password policy settings by using a user-friendly single screen interface.

FGPP-5

All other password settings are familiar except the precedence. The precedence field accepts arbitrary integer values in which lower numbers denote higher priority.

Even though it is not recommended, you can apply more than one password settings to an Active Directory user. In this specific scenario, if user is member of ACME-Users group as well as ACME-Admin group, the password settings linked with ACME-Admin group will be enforced to the user because the precedence number (1) in password settings linked with ACME-Admin is lower than the precedence number (100) in password settings linked with ACME-Users.

FGPP-6

FGPP-7

Create password settings based on the required user groups and make sure the respective groups are added to the concerned password settings policy.

FGPP-8

Below TechNet link provides details of the password policy settings. http://technet.microsoft.com/en-us/library/cc770394(v=ws.10).aspx

Now we have successfully created our fine-grained password policy. We can verify the password settings associated with any user object in Active Directory by opening Active Directory Administrative Centre, then right click on the user and select view resultant password settings. This will bring up the password setting associated with the objects.

FGPP-9

The following message box appears when you try to change the password for a user account with a fine-grained password policy applied to it and that password fails to meet the policy requirements:

FGPP-10

Some New Features and Enhancements in Windows 2012 R2 Preview.

Content in this post applies specifically to Windows Server 2012 R2 Preview is preliminary and subject to change in future releases.

Enhanced Session Mode in Windows 2012 R2 Preview

The previous versions of Hyper-V only provided redirection of the VM Screen, Keyboard, Mouse and some limited copy/paste functionality. Additional redirection abilities depended on Remote Desktop Connection to virtual machine which require a network to the Virtual Machine.

The Virtual Machine Connection tool in Windows Server 2012 R2 Preview Hyper-V now support redirection of local resource similar to the Remote Desktop Connection session. The enhanced session mode connection uses virtual machine buss (VMBuss) to connect to the Remote desktop connection session so no network connection to the virtual machine is required.

The Virtual Machine Connection tool in Windows Server 2012 R2 Preview Hyper-V is disabled by default.

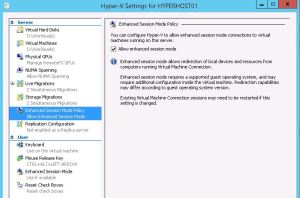
To enable, Right click on Hyper-v server under Hyper-V manager and then select Hyper-V Settings,

Enhance Session1

Select Enhanced Session Mode policy and then enable Allow enhanced session mode.

Enhance Session2

This setting affects all virtual machines running on the server running Hyper-V.

The following guest operating systems support enhanced session mode connections:

  • Windows Server 2012 R2 Preview
  • Windows 8.1 Preview

The following local resources can be redirected when using the Virtual Machine Connection tool.

  • Display configuration
  • Audio
  • Printers
  • Clipboard
  • Smart cards
  • USB devices
  • Drives
  • Supported Plug and Play devices

Enhance Session

Additionally the Remote Desktop Service needs to be running and the user account you be using to log on to the virtual machine needs to be a member of the Remote Desktop Users local group or the local Administrators group.

A proper USB device redirection in Hyper-V environment is still not available, however enabling the Enhanced session mode will be much useful in following scenarios:

  • Accessing physical drives without the need for a network connection to the virtual machine.
  • Login to the virtual machine via smart card
  • Printing from a virtual machine to a local printer
  • Adjusting display size to match with screen resolution.
  • Testing application running in virtual machine that require USB redirection without need to use remote desktop connection.

Cross-version Live Migration

Live migration was introduced in Windows Server 2008 R2 to provide a high-availability solution for virtual machines running on Hyper-V hosts. Later in Windows Server 2012, it enhanced the feature by supporting live migration in a non-clustered environment and allowing multiple live migrations simultaneously.

Windows Server 2012 R2 Preview Hyper-V live migration has been updated to support cross-version live migration. This cross-version live migration allows you to upgrade your private cloud solution from Windows Server 2012 to Windows Server 2012 R2 with zero downtime for the workloads running on your virtual machines.

Moving a virtual machine to a down-level server running Hyper-V is not supported.

Cross-version live migration can be performed using any of the live migration options supported by Windows Server 2012 including:

  • Live migration on a failover cluster
  • Live migration between failover clusters
  • Live migration using a Scale-Out File Server that supports SMB 3.0
  • Shared nothing live migration where no shared storage is used for the virtual machines

Shared Virtual Hard Disk

Hyper-V in Windows Server 2012 R2 Preview enables clustering virtual machines by using shared virtual hard disk (VHDX) files. The shared virtual hard disks enable multiple virtual machines to access the same virtual hard disk (VHDX) file, which provides shared storage for use by Windows Failover Clustering. The shared virtual hard disk files can be hosted on Cluster Shared Volumes (CSV) or on Server Message Block (SMB)-based Scale-Out File Server file shares.

Shared VHD1

The shared virtual hard disk (VHDX) is very useful, particularly in hosting environments where it enables the hosters to keep their customers’ virtual machines and their own supporting infrastructure separate. It also avoids directly exposing the fibre channel or iSCSI LUNs to clients as in Windows Server 2012 to provide shared storage to VMs.

sharedVHD

Storage Quality of Service

Storage QoS enables to specify the maximum and minimum I/O loads in terms of I/O operations per second (IOPS) for each virtual disk in the virtual machines. Storage QoS ensures that the storage throughput of one virtual hard disk does not impact the performance of another virtual hard disk on the same host. An alert can be configured to trigger when virtual machines are not getting enough IOPS for storage access.

QOS

This feature can be useful for configuring different service-level agreements (SLAs) for different types of storage operations within the infrastructure. For instance, a hosting service provider may use this feature to configure Bronze, Silver, and Gold SLAs for storage performance available for different classes of tenants.

At the same time, an overactive or disruptive virtual machines which is saturating the storage array in the environment can be restricted.

Generation 2 Virtual Machines

Hyper-V in Windows Server 2012 R2 Preview includes two supported virtual machine generations. The virtual machine generation determines the virtual hardware and functionality that is presented to the virtual machine. A mixture of generation1 and gereation2 virtual machines are supported on the same hyper-V host.

Generation 1   Provides the same virtual hardware to the virtual machine as in previous versions of Hyper-V.

Generation 2   (Currently supported to run only 64-bit versions of Windows 8/ Windows Server 2012 or later) provides the following new functionality on a virtual machine:

  • Secure Boot (enabled by default)
  • Boot from a SCSI virtual hard disk
  • Boot from a SCSI virtual DVD
  • PXE boot by using a standard network adapter
  • UEFI firmware support

Generation

IDE drives and legacy network adapter support has been removed in Generation 2 virtual machines.

A Generation 2 virtual machine can be created using the New Virtual Machine wizard. Once a virtual machine has been created, you cannot change its generation.

Tiered Storage Spaces

Windows Server 2012 R2 preview version of Storage Spaces now support tiered storage solution that provides greater performance and scalability. The new version supports a mix of SSD and HDD in a single storage space which automatically moves the workload’s most frequently accessed data (hot blocks) to the SSD tier while rest of the workload’s data is stored on the HDD tier.

This seamless movement of data between tiers is configured by default to happen daily in 1 MB chunks, but the configuration schedule can be modified using Windows PowerShell commands.

Storage Space

Storage Spaces in Windows Server 2012 R2 can thus ensure that the workload’s hot data is always stored on the SSD tier to take advantage of the high performance of this tier, it’s cold data on the HDD tier to make use of the high capacity of this tier. Whenever a portion of the data for a particular file becomes hotter, then it gets moved from the HDD tier to the SSD tier. At the same time whenever the portion of data becomes cooler, then it gets moved from the SSD tier to the HDD tier.

Hyper-V Replica

Hyper-V Replica provides asynchronous replication of virtual machines between two Hyper-V hosts which do not have a shared storage or any particular storage hardware. Any server workload virtualized on Hyper-V can be replicated using this capability, and replication is encrypted during transmission and works over any IP-based network. The hyper-V host machines do not need to be in the same domain or even domain-joined at all, they can either be physically collocated or widely separated geographically.

Extended Repl1

Extended Repl

The replication frequency can be controlled based on the bandwidth availability and criticality of the workloads. Windows 2012 R2 provides choice of 30 seconds, five minutes, and 15 minutes.

Replication

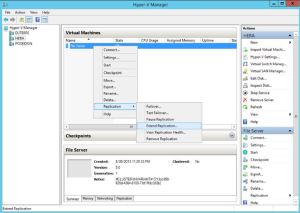
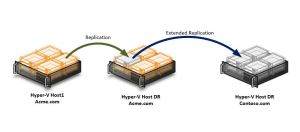
The extended replication feature provides the ability to have a Hyper-V Replica virtual machine replicated to another Hyper-V server for extended disaster recovery capabilities. For example, virtual machine replicated from a server in the production environment to disaster recovery environment can now have the replica further replicated to another environment.

Automatic Virtual Machine Activation

This enables activation of virtual machines running on Windows Server 2012 R2 without individual activation of workloads even in a disconnected environment. AVMA binds the virtual machine activation to the licensed virtualization server and activates the virtual machine when it starts. The operating system on the guest virtual machine must be Windows Server 2012 R2 Preview Datacenter, Windows Server 2012 R2 Preview Standard, or Windows Server 2012 R2 Preview Essentials.  AVMA also provides real-time reporting on usage, and historical data on the license state of the virtual machine.

Work Folders

Work Folders address the bring-your-own device (BYOD) scenario, enabling users to store and access work files on personal PCs and devices as well as corporate PCs. Users will have a convenient location to store work files and access them from anywhere while organizations maintain control over corporate data by specifying user device policies such as encryption and lock screen passwords.

WorkFolders

In short, the work Folders bring the functionality of Dropbox to corporate servers.

Creating bootable USB flash drive.

There was a time when Microsoft Operating System installer used to come in DVDs. In order to reduce cost and avoid delay in shipment, Microsoft has changed their policy and started providing iso images for download. We burn the iso image to DVD and then boot the system with the disc to start installation of Operating System. But now, since USB flash drives become very cheap, it literally started replacing DVD discs. Compared to DVD discs, USB disks are more reliable, easy to carry and can be easily reused.

This blog post is to help you to create a bootable USB flash drive for installing any Windows Operating Systems.

Pre-requisites:

  • USB flash drive with 4GB or higher storage capacity
  • .iso image of the Windows Operating System
  • A system running Windows Operating System (recommended Windows 8 so that you can use the built-in Disk Image Tools to Mount the .iso image as CD drive)
  • WinRar or any similar application to extract .iso image content.

Steps to create bootable USB disk

  • Run Command.exe with administrator privilege

USB1

  • Run Diskpart utility to partition the USB disk
  • Type List Disk to list all the disks attached to the system. Note down the disk# of newly connected USB drive.
  • Type Select Disk # where # represents the newly connected USB drive.
  • Note: the following steps will wipe the selected disk so make sure that you selected the correct disk # representing your USB drive.
  • Type Clean to delete data including partition on the disk.
  • Type Create Partition Primary to make a new partition.
  • Type Active to mark the newly created partition as active.
  • Type Format FS=NTFS Quick to format the USB drive.
  • Type Exit to close the Diskpart.

USB2

  • Use Windows 8 to mount the .iso image, the image content will be mounted on CD Drive.

USB3

  • If you are running any other operating system, use any iso image extractor application to copy the content to USB drive

USB4

  • Copy all the content and paste them to the newly formatted USB drive.

USB5

Congratulations! You have a bootable USB disk now.

Connect the USB drive to new system, change boot option to boot with USB and follow the Operating System installation steps.

Failed to install .Net framework 3.5 features in Windows Server 2012.

This is a known issue that most of the time the Server manager Roles and Features installation wizard throws error while installing .Net framework 3.5 features.

How to Fix it:- Read more of this post

Live migration outside a clustered environment

In order to bring the host server offline for maintenance and also to maintain optimal use of physical resources, you must be able to move virtual machines without disrupting the business. Windows Server 2008 R2 introduced live migration, which made it possible to move a running virtual machine from one physical computer to another with no downtime and no service interruption.

Windows Server 2012 enhanced the migration feature. Live migration in windows 2012 is no longer limited to a cluster. Virtual machines can be migrated across cluster boundaries, including to any Hyper-V host server in your environment.

Windows Server 2012 Hyper-V live migration lets you perform live migration outside a failover cluster. The two scenarios for this are:

SMB-based live migration. In this scenario, the virtual machine’s hard disk is stored on a central SMB file share. You may then perform a live migration of the virtual machine from one server to another while their storage remains on the central SMB share.

“Shared-nothing” live migration. In this case, the live migration of a virtual machine from one non-clustered Hyper-V host to another is possible when the virtual machine’s hard drive storage is mirrored to the destination server over the network.  The storage mirroring can be done through any third party storage replication technique. Now you may perform the live migration of the virtual machine from source server to the destination server while it continues to run and provide network services.

In both the cases, the virtual network configuration should be identical.

“Unable to successfully cleanup” Error while creating Windows 2008 R2 Server.

Most of the time, while creating a two node Windows 2008 R2 server Failover Cluster with a low privileged domain account,  you might end up with a generic cluster failure error called “Unable to successfully cleanup”.  You will be surprised to see that the cluster validation on both the nodes complete without any error or warning!.

Resolution:

Most of the cases, this is related to too many ACE’s in the ACL.  Most of the time appears while you are creating the cluster with a user having limited permission in active directory.  In such scenario, we can try to prestage the CNO and remove inheritable permissions which should reduce the number of ACE’s.

Step-by-Step Guide:

Step-1: Prestage a computer account with the name of the new cluster account and disabled it (The account must be disabled so that when the Create Cluster wizard is run, it can confirm that the account it will use for the cluster is not currently in use by an existing computer or cluster in the domain).

Step-2: From Active Directory Users and Computers, right click the Properties of the Prestaged cluster account. Click on Security Tab and then click advanced Button of the Accounts. Clear the checkbox Allow inheritable permissions from parent to propagate to this object and all the child objects. Select Remove when the Security dialogue box opens.

Step-3: Replicated the changes to all other Domain Controllers

Step-4: Create cluster and validate


Additional Resources:

Failover Cluster Step-by-Step Guide: Configuring Accounts in Active Directory
http://technet.microsoft.com/en-us/library/cc731002(v=ws.10).aspx

Microsoft Windows Server 2012 New Features

Standard or Datacenter Editions Only:

Microsoft Windows Server 2012 core OS is now the same and the edition you can buy is either Standard or Datacenter depends on whether you want to run up to two virtual machines as guests or unlimited guest virtualization. Unlike its predecessor, there’s no Enterprise edition available.

Switchable Core and Full Installation:

The emphasis for Windows Server is changing from GUI to command line. When you first install the OS, the default selection is core installation, you have to select Full installation if you intend to use GUI interface. However once you install a core version of Windows Server 2012, you can flip on a GUI simply by installing the GUI role, and you can then opt to take it off without a full reinstall.


You can use the GUI mode to take care of the entire baseline configuration task. Once the servers are ready for production, you can flip the GUI off and deploy. This reduces the attack surface, resource load and energy requirements etc.


New Server Manager User Interface:

Read more of this post