Enrolling iOS device through Company Portal App


As an alternative to enrollment with the Company Portal app, you can leverage the Apple Device Enrollment Program (DEP) or the Apple Configurator tool to bulk enroll the corporate-owned devices. However, in this post we will be describing the steps required to enroll the iOS devices through Company Portal App.

From your apple device (I am using iPhone4 for this demo), launch the App Store application

IMG_0001

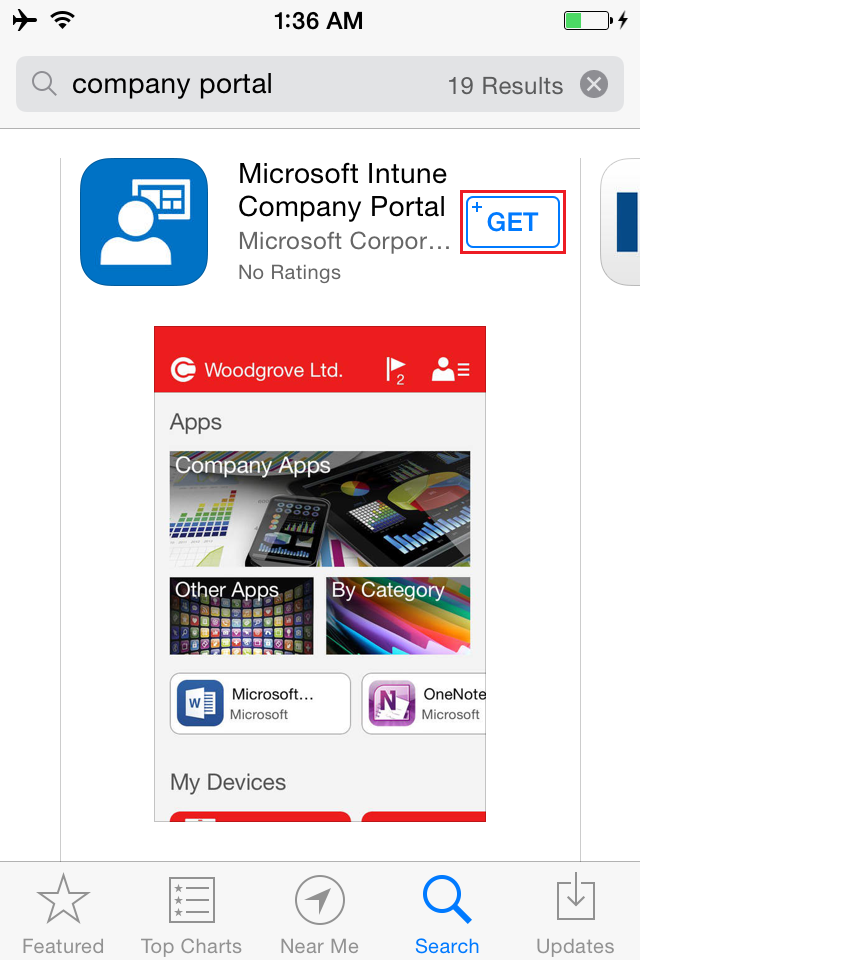
From the Search field, search for “Company Portal”, you should get the Microsoft Intune Company Portal as first option.

IMG_0002

Press the GET button to download and install the Company Portal App

IMG_0002a IMG_0003

Once the installation is completed, you will see a new icon among your listed apps, Open the Company Portal App to launch it.

IMG_0004

Press the sign In button to login

IMG_0004a

Key in the domain username, you may notice that the login page will be automatically redirected to your organizations branded login page to enter the username and password.

IMG_0004b  IMG_0004c

Notice that the company logo or brand name is displayed

IMG_0004d

After login is successful, the Company Access Setup wizard will start by displaying the Device enrolment and device compliance status. Press Begin to start the enrolment process.

IMG_0005

The next couple of screens will show you the benefits and privacy features of enrolling the device.

Press continue twice to run through the information details of enrolling the device .

IMG_0006  IMG_0007

Press Enroll to initialize the device enrolment process

IMG_0008

Press sign in to start the device enrolment process

IMG_0010

The screen will then jump to the iOS internal management profile installation process. You can see here that the management profile for the domain (flanker) is verified and the same is signed by the Microsoft Intune service IOSProfileSigning.manage.microsoft.com.

To continue, press the Install button, and confirm when asked to Install Now.

IMG_0011

The process will setup all the required management services and certificates

IMG_0012

Once again the wizard will ask for one final confirmation. Press Install and Done when complete

IMG_0013  IMG_0014


IMG_0015  IMG_0016

Notice that the Company Access Setup displaying the Device enrolment and device compliance status as Successful

press Continue to proceed

IMG_0017

Press Done at the company Access Setup Complete screen

IMG_0018

The Company Portal App will display the enrolled device under My Devices. You will now have access to Apps and Device Information

IMG_0019

pressing the device will display the details of the device enrolled.

IMG_0020

The Intune administrator can view the enrolled device listed in the Intune admin portal as well.

IMG_0022

IMG_0023


iOS device management with Microsoft Intune

Microsoft Intune provides iOS and Mac OS X device enrollment to give access to company email and apps to iPhone, iPad and Mac users. Once users install the Intune company portal app, their devices can be targeted with policy using the Intune administration console.

Before you can manage iOS and Mac devices, you must import an Apple Push Notification service (APNs) certificate from Apple.

Steps to manage iOS and Mac devices with Microsoft Intune

Set up Intune: ensure that the mobile device management authority is set as Microsoft Intune.

01.SetMDMIntune

Get a certificate signing request: This certificate allows Intune to manage iOS and Mac devices and establishes an accredited and encrypted IP connection with the mobile device management authority services.

1 DownloadRequest

click Download the APNs certificate request. Save the certificate signing request (.csr) file locally.

2SaveRequest

The .csr file is used to request a trust relationship certificate from the Apple Push Certificates Portal.

Get an Apple Push Notification service certificate: Go to the Apple Push Certificates Portal and sign in with your company Apple ID to create the APNs certificate using the .csr file.

3 Apple Portal

4 AppleLogin

Note: This Apple ID must be used in future to renew your APNs certificate.

Click on Create Certificate to submit the certificate request

5Create Cert

Click on Browse to locate the locally stored certificate signing request (.csr) file and then click Open

6CertUpload

Cancel the. json file download notification

7json

Refresh the page and you will find the newly created certificate listed under “Certificates for Third-party serversselect the Certificate you want to download and click Download

8Download Cert

Download the APNs (.pem) certificate and save the file locally. This APNs certificate file is used to establish a trust relationship between the Apple Push Notification server and Intune’s mobile device management authority.

9 Save Cert

Now we need to add the APNs certificate to Intune. click Upload the APNs certificate.

10 upload Certificate

Browse to the locally saved certificate (.pem) file and click Open and then enter your Apple ID. With the APNs certificate, Intune can enroll and manage iOS devices by pushing policy to enrolled mobile devices.

11 Upload

Once the APNs certificate is uploaded successfully, the Intune portal will show the status as “Ready for Enrolment

12Ready


Now we can inform the users to get access to company resources through the company portal.

Please refer to the “Enrolling iOS device through company portal blog for enabling iOS device management. In this post, we will demonstrate how the end user is going to enroll their own iOS device with Microsoft Intune.


Enabling mobile device enrollment using Microsoft Intune

In order to enroll the mobile devices with Intune, The Cloud administrator must configure Intune as the Mobile Device Management authority, add users and setup the portal for the users to register the devices.

Currently there are three types of Mobile Device Management solutions available with Microsoft, they are: Intune, Configuration Manager with Intune and Office 365 MDM solutions.

This post describes the step by step guidelines required to configure Mobile Device Management solution using Microsoft Intune without System Center Configuration Manager integration.

How to set mobile device management authority:

1.IntuneConsole

  • In the Tasks list, click Set Mobile Device Management Authority. The Set MDM Authority dialog box opens.

2.EnableIntune

  • At the confirmation page, Check the box and then click OK to use Microsoft Intune to manage mobile devices.
  • Microsoft Intune is set as the Mobile Device Management authority. Now we can enable device enrollment for devices.

3.SetMDMIntune


Preparing mobile device management with Microsoft Intune:

  • Add Intune users: The mobile device owner must be added to the account portal before devices can be enrolled. The Azure Active Directory synchronization facilitate to add users in the account portal. You can also add individual users through the Office 365 admin center and use .csv file to bulk add users.

3a. users

  • Create groups (Optional) : Groups in Intune provide great flexibility in managing your devices and users. The Azure Active Directory synchronization enables to use security groups to refine policy deployment by geography, department, or users known to use certain devices. The groups cannot dynamically target device operating system.

4a.Policy

4b.Groups

  • Add policies for devices (Optional): Policies are groups of settings that control features on devices. Most MDM policies are platform specific. The type of policies available are: Configuration policies – Set platform specific management of device settings, Compliance policies – Monitor and remediate compliance issues for devices, Conditional access policies – Use with compliance issues to enable access to company resources like email and SharePoint.

4.Policy

  • Set device enrollment limit (Optional): This limits the number of mobile devices a user can enroll. To set the limit, click Admin > Mobile Device Management > Enrollment rules. Set the maximum number of devices a user can enroll and then click Save.

5.Enrolment rule

  • Set Company Portal settings: Customize the Intune Company Portal for your company. By providing the Company Name, Department Name, Phone Number, privacy statement URL etc. click Admin > Company Portal and provide custom details.

6.Company portal

  • Set Terms and Conditions: You can publish terms and conditions that your users will see when they first use the company portal from any device, whether or not that device is already enrolled. Click Policy > Terms and Conditions, and then click Add to create a new terms and conditions policy.

7.Terms and condition

Now you can enable device enrollment for the following devices:

  1. Enable iOS management
  2. Enable Android management
  3. Enable Windows Phone management
  4. Enable Windows management


Please refer to the “iOS device management with Microsoft Intune” blog for enabling iOS device management

Restricting Directory synchronization to Organization Unit

The default configuration of Azure Active directory connector will take all objects in all domains in the forest to synchronize with Azure Active Directory tenant. In fact, this recommended configuration will facilitate access to the complete Global Address List. With this, the end user using cloud services such as Exchange Online and Skype will have same experience of an on-premises implementation.

In some cases, you may have the requirement of synchronizing only a specific set of users. For instance, the management decision to restrict the cloud service to only users from sales department. In this case you need select users from Sales OU only (assuming the users are in their respective department OUs). In other scenario where you do not want to synchronize the service accounts which are used for only on-premises service.

With filtering you can control which objects should appear in Azure Active Directory from your on-premises directory. Selecting only the required objects for synchronization will provide more security by reducing the surface area attacks. Filtering can also help to limit the number of objects, which can keep the Azure Active Directory Sync database small enough to use the default SQL Express Local Database.

Following are the filtering options which can be applied to the Azure Directory Synchronization tool:

  • Domain based: This option allows selection of the domains to synchronize to Azure AD, this will include all object types in the selected Domain(s).
  • Organizational Unit based: This option allows selection of the OUs which will synchronize to Azure AD, this will include all object types in the selected in selected OU(s).
  • Attribute based: This option allows to filter objects based on attribute values on the objects.

You can use a combination of the above filtering options available. When multiple filtering options are used, the tool will use a logical “and” condition among the filters.

In this post, we will be describing the steps used in configuring the OU based filtering.

First of all, we will disable the “Azure AD Sync Scheduler” from the local task scheduler. This will eliminate the risk of accidentally synchronizing the objects which we have not yet verified.

Start Task Scheduler from the start menu.

Directly under Task Scheduler Library find the task named Azure AD Sync Scheduler, right-click and select Disable.

Capture0


Configuring Organizational Unit based filtering

To configure organizational-unit–based filtering, perform the following steps:

Logon to the server that is running Azure AD Connect sync tool using an account that is a member of the ADSyncAdmins security group.

Start Synchronization Service from the start menu.

Capture

Select Connectors and in the Connectors list, select the Connector with the type Active Directory Domain Services. From Actions select Properties.
Capture1

Click Configure Directory Partitions, select the domain you want to configure, and then click Containers.

Capture2

When prompted, provide any credentials with read access to your on-premises Active Directory. It does not have to be the user which is pre-populated in the dialog box.

Capture4

In the Select Containers dialog box, clear the OUs that you don’t want to synchronize with the cloud directory, When you are done, close the Properties dialog by clicking OK.

Capture5

Now the filter is applied, do not forget to enable the “Azure AD Sync Scheduler” from the local task scheduler.

Capture10

Notice that only the objects under the selected Organization Unit gets synchronized to the Azure tenant.

Enabling Multi-Factor Authentication in Azure

Azure Multi-factor authentication is a method of validating who you are, which involves the use of more than one verification methods. It provides an additional layer of security to user authentication and transactions.

Azure Multi-Factor Authentication helps to safeguard access to data and applications. It delivers strong authentication with a range of easy verification options such as phone call, text message, or mobile app notification. It also allows users to choose the method they prefer.


To Enable Multi-Factor Authentication, logon to the Azure management portal (http://manage.windowsazure.com)

 Capture

Click on Active Directory and select your Directory Services.

Capture1

Navigate to the Configure tab of your directory and scroll down until you see the multi-factor authentication section

Capture2

Click on the manage service settings link. This will open the multi-factor authentication administration portal.

Capture3

At the bottom of the first page, select the checkbox Allow users to suspend Multi-Factor Authentication by remembering their devices and keep the default set to 14 days.

This will allow the user to remember a device when using MFA. Which means the second factor of authentication is not prompted for unless they come from an unknown device.

Keep everything else set to defaults.

Capture4

Click the Save button to commit your changes.

Capture5

Once the operation completes, click the Close button to go back to the MFA administrative portal.

Capture6

Now, enable the user account in your organization for MFA. Click on the USERS tab in the left top corner of the screen.

Capture7

Click the check mark next to your user account you wanted to enable, then click the enable link on the far right hand side of the screen to enable MFA for this user.

Capture8

When prompted for confirmation, click the enable multi-factor auth button.

Capture9

Click Close on the Updates successful dialog when it appears.

Capture10

The user account is now enabled for multi-factor authentication.

Next time the user signs in, he/she will be asked to provide and confirm the authentication information that will be used to perform MFA from that point onwards.


Register as a User for MFA

Once the MFA is enabled for the user, the user has to register himself for the multi-method of authentication verification.

When the user logs on to his application portal ( https://myapps.microsoft.com ) for the first time since the administrator has enabled MFA, After the user is authenticated the user is asked to provide additional security information: Your admin has required that you set up this account for additional security verification.

Click on the Set it up now button.

Capture12

On the next page, you can choose among 3 contact methods:

  • Authentication phone
  • Office phone
  • Mobile app

Select the Authentication phone contact method

Select the method Send me a code by text message

Select your Country and enter your Mobile number to receive the authentication code. Then click on Contact me

Capture13

Enter the 6-digit code that you received on the next screen and click the Verify button.

Capture13c

Capture13a

In the additional security verification page, app password will be displayed. This password can be used instead of performing multi-factor authentication to access the application which is not MFA aware.

Click on Done to complete the MFA registration process.

Capture13b

You can always get back to it later by going to http://aka.ms/mfasetup.

You are done! The user will be prompted for MFA from now on whenever he/she sign in.

Once you click on Done to complete the MFA registration, the browser will refresh and bring back to the sign in page, Enter the 6-digit text message that is sent again to your phone.

Capture16


Notice the checkbox Don’t ask again for 14 days, this option allows Azure to remember the device in the future so that it does not prompt you for MFA the next time your sign-in.

This is the same configuration option we enabled earlier with the Azure admin account.


Enabling additional MFA capabilities.

The above described MFA capabilities are included as part of the Office 365 license. we can utilize the Azure AD Premium license to leverage additional MFA capabilities such as Custom greetings, Fraud alert, Event Confirmation, Block/Unblock Users, Security Reports etc…

In order to configure these capabilities, click on ACTIVE DIRECTORY in the left navigation bar of the Azure administrative portal and select your directory where you have enabled Azure AD Premium licenses for users.

Click on USERS and then click on MANAGE MULTI-FACTOR AUTH at the bottom of the page.

Capture17

Click on Service Settings and then click on Go to Portal at the bottom of the page

Capture18

The following page will appear where you can configure advanced settings and also access Azure MFA reports.

Capture19


Publishing web based Intranet applications using Azure AD Application Proxy.

Azure AD Application Proxy is a new feature available in Azure AD Premium and Azure AD Basic. This is a type of reverse proxy solution that enables access to web-based applications that exist on a corporate network, secured behind a corporate firewall.

The advantage of using Azure AD Application Proxy over the traditional firewall publishing application to the external users are:

  • The application can leverage the enhanced security of Azure AD pre-authentication in addition to enable Azure Multifactor authentication.
  • The corporate applications can be listed under user’s Azure application access panel or Office 365 menu.
  • The users can access all internal web-based applications as well as 3rd party SaaS applications from the same place.
  • Once the user logs on to Azure Active directory or O365, he/she can launch the assigned applications without login on to these applications individually.

Prerequisites:

There are a few requirements need to be met in order to run Azure AD Application Proxy, such as:

  • One domain-joined Windows Server 2012 R2 or Windows 8.1 or higher on premises is required to install the Azure AD Application Proxy Connector. This server must be able to send HTTPS requests to the Application Proxy services in the cloud and to the web applications you intend to publish. The connector installed on multiple server is recommended as best practice to avoid single point of failure.
  • Along with the Azure AD Application Proxy Connector Server, there are several firewall ports that must be opened externally. A detailed list of those ports can be found here: https://azure.microsoft.com/en-us/documentation/articles/active-directory-application-proxy-enable/

This post illustrates how to publish a web based Intranet application using Azure AD Application Proxy.

Setup requirements:

  • Working URL (http://websrv01:8080) of the intranet web application (for this post, I have created a simple web page in IIS running on my web server WebSrv01.
  • Active Azure Active Directory subscription and access to the Azure Management Portal.

Adding the Application

Browse to the Azure Management Portal https://manage.windowsazure.com and Click Active Directory tab.

Select the directory in which you enabled Application Proxy and for which you want to publish an application (for example, Contoso).

Click on the arrow to get into the directory.

Capture2

Browse to Applications and then click the ADD button at the bottom of the screen

Capture3

Choose to Publish an application that will be accessible outside your network.

Capture4

Name: Provide Name of the application

Internal URL: the URL used to access the web site locally from the intranet site. The application proxy connector uses this URL to access the application internally. (for example: http://websrv01:8080)

Preauthentication method: specify the authentication method to be used for the application

You have two options here:

Azure Active Directory – whenever user tries to access the application, application proxy will redirect the user to log in with Azure AD which will authenticate the user to ensure that the user has the necessary permissions for the directory and the application.

Pass through – No preauthentication is performed.

Capture5

Ensure that the Application Proxy is enabled, if not, click on Enable Application Proxy.


Installing the Connector

Download the Azure AD Application Proxy Connector and install it on the web server or on a separate machine that has connectivity to the web server. Microsoft recommends to install the Application Proxy Connector on a separate dedicated server running on HA mode.

Click on the Download a Connector tab

Capture6a


accept the license terms and privacy agreement to download the connector.

Capture6b

Copy the downloaded connector to the dedicated server, in our case the Web Server itself

Capture6c

To install the connector, accept the license agreement and click on Install.

Capture7

Enter credentials that has Global Admin permission on the Azure AD tenant and then click Sign in

Capture10

Capture8

After the setup is successful, click on Close to exit the installation wizard.

Capture10x

After the installation complete, go back to the created application and click on the view connector status

Capture11

Make sure the status shows Active.

Capture11a


Assign Users

Since we chose to publish the application with Azure AD pre-authentication, we should assign the application to individual users or to groups.

Click on Assign Accounts

Capture12

Chose Groups or user to assign permission. Click the ASSIGN button at the bottom of the screen.

Capture13

Configure Additional Settings

Click on Configure to make additional configurations for the application.

Click on the UPLOAD LOGO button at the bottom of the screen to add custom logo for your application.

Capture14

The External URL which is used to access the published application over the internet is displayed.

By default, applications are published by using the HTTPS protocol. The service will automatically redirect users who type the URL with HTTP.

Capture15

Open a new session on your browser and logon to the user application access panel through https://myapps.microsoft.com/.

Capture16a

Notice the newly assigned application is appeared on the list of applications.

Click on the FlankerWeb icon to access the application.

Capture17

The web page running on the internal web server is displayed.

Capture18


Directory Synchronization using Azure AD Connect

In this post we will configure Directory integration between Azure Active Directory and Windows Server Active Directory using the Azure AD Connect Tool.

Integrating your on-premises directory services with Azure AD will allow users to take advantage of a common identity when accessing both your on-premises and your cloud environments. In other words, the Azure AD give you similar sign-on experience.

Synchronizing both the on-premises and cloud directories have the following benefits:

  • The default option sync with the password hash which allows sign on to cloud resources based on Active Directory passwords.
  • Users will be able to access Office 365, Intune, SaaS apps and third-party applications without having to remember and manage a separate set of credentials.
  • The application developers can build solutions leveraging a common identity model, integrating into on-premises or Azure directory services for cloud-based applications

Let us look at some of the prerequisites:

  • A dedicated member server(recommended) running Windows Server 2008 or later or a Domain Controller
  • Internet access on the server installing Azure AD Connect
  • Azure AD administrator account for the Azure tenant you wish to integrate with on-premises
  • An enterprise administrator account for the on-premises active directory services which will be integrated to the Azure AD tenant.

Hardware requirements for Azure AD Connect

The table below shows the minimum requirements for the Azure AD Connect sync computer.

Number of objects in Active Directory CPU Memory HDD
Fewer than 10,000 1.6 GHz 4 GB 70 GB
10,000–50,000 1.6 GHz 4 GB 70 GB
50,000–100,000 1.6 GHz 16 GB 100 GB
For 100,000 or more objects the full version of SQL Server is required
100,000–300,000 1.6 GHz 32 GB 300 GB
300,000–600,000 1.6 GHz 32 GB 450 GB
More than 600,000 1.6 GHz 32 GB 500 GB

Installing and configuring Azure AD Connect.

To get started using Azure AD Connect, download the latest version from the following link: https://www.microsoft.com/en-us/download/details.aspx?id=47594 to the server dedicated for Azure AD connector installation.

Capturex

Double click on the downloaded installer (AzureADConnect.msi) to start installation.

Capture1

On the Welcome page, click on agree to the license terms and privacy policy to continue.

Capture2

Select the Use express settings. This is appropriate if you have a single forest and wish to configure the password synchronization.

Capture3

In the next step, enter the Global Administrator credentials for the Azure tenant to connect the AD connector tool to the Azure Active directory.

The Global Administrator credentials are used to create a service account that will take care of the synchronization.

click Next to continue.

Capture4

In the next page enter the On-premises Enterprise administrator credentials for the tool to connect to the on premises Active Directory service. The enterprise administrator credential is used only to create service account and grant proper permissions.

click Next to continue.

Capture5

In the “Ready to configure” page, verify that the settings are the ones you intended before you click the checkbox to start the synchronization process after the configuration is complete.

Capture6

As part of the configuration, the tool will install a local instance of SQL Express to support the sync process and the Sync service.

Capture7

When the installation complete, you will get a confirmation page.

Capture8

Wait for few minutes for the synchronization to take place, then logon your Azure portal and verify that all your accounts have been synchronized.

Notice that the directory integration tab under your tenant is showing ACTIVATED.

Capture10

Select USERS under the tenant to verify that the user accounts in the on-premises active directory are displayed.

Capture11x


Azure Active Directory Configuration

In this post we will create an Azure Active Directory tenant, a tenant administrator and some users.
Create Azure Active Directory Tenant

logon to the Azure management portal (https://manage.windowsazure.com) using your Azure administrator account

Capture

Click on the New button
Capture1

Choose the options as marked below
Capture2
Select CUSTOM CREATE
Capture3
Select Create new directory option, then provide a friendly name which will be displayed on the portal.

Make sure to choose a Unique Domain Name for your Directory, and then select your country or region. click on Tick mark to continue.
Capture4
Under the Active Directory Tab, notice that the newly created Tenant is displayed.


Create Tenant Administrator Account

Go to the Azure AD tenant and select USERS.
Click on the ADD USER at the bottom of the screen.
Capture5
Fill in the details of the User and click right arrow to go to the next section.
Capture6
Select the Role you want to assign to the user. Since we are going to create Tenant administrator account, we will select Global Admin role.
Provide an alternate email address for recovery, you may use any email address here. This is required only if you select Global admin role.
Click on the box if you want to enable Multi-Factor Authentication
Click right arrow to go to the next section

Capture7
Click on Create

Capture8

Remember the initial password or click on the Copy icon to copy the password, you will be forced to reset the password during the initial login.

Capture9

Open your browser and go to https://login.microsoftonline.com to login with the tenant administrator account.
Type in or paste the temporary password and click on Sign In.

Capture10

Update the account with a strong permanent password.
Click on submit to complete login process.
Capture10a

You are successfully logged in to the newly created tenant with Global Administrator account privileges.
Capture11


Create User Account

go back to the ADD USER steps mentioned above (click on ADD USER under Azure AD tenant, USERS tab)

Fill in the details of the user and select User under the Role and follow the wizard.


Low cost Automatic Failover-Disaster Recovery scenario for Microsoft File service without using expensive SAN replication technology.

Note before you start:Those who are going to implement this solution in their production environment, please visit the “Information about Microsoft support policy for a DFS-R and DFS-N deployment scenario” link (http://support.microsoft.com/kb/2533009) and understand the Microsoft support policy regarding the solution.

The objective of this post is to provide a low cost high availability Disaster Recovery solution for Microsoft file services.  Generally hosting the File Service on a Microsoft failover cluster is sufficient enough to provide high availability of user data. However, for an organization whose data availability is business critical or are using a VDI solution where user profile/data are stored on file servers, the file service should be available even if the cluster itself is offline due to a disaster in the datacenter.

The following design provides you File Service availability through the Disaster Recovery site without utilizing any expensive SAN storage replication technique.

In this scenario, we will require a two node windows failover cluster in production as well as disaster recovery sites to host the file service. Each cluster will be connected to their respective local SAN storage within their sites.

FileCluster

Shared folder configured on a Client Access Point will be used as a target folder for DFS Namespace. Since the Client Access Point can withstand cluster node failure, the Shared folder will be available even one of the cluster node is offline for maintenance.

DFS01

We need to take this scenario to a further stage where the service can be available even when the whole production datacenter is down. A multi-site cluster (geo cluster) using SAN replication would be very expensive in terms of license cost and complexity in implementation.  By tweaking the built-in replication feature (DFS-R) in Windows server Operating System, the above requirement can be achieved without any additional cost.

Step1: Configure domain-based DFS namespace, add both (production as well as DR) servers as Namespace Servers.

DFS02

Step2: Create a Shared Folder on Client Access Point, link the shared folder to the above DFS namespace.

Step3: Create a Shared Folder on DR Client Access Point, add the shared folder as secondary Target Share for the production shared folder.

DFS04

Step4: Run through the “New Replicated Folders Wizard” to configure the shared folder in DR site as full mesh replica.

DFS03

Step5: Set the target priority by configuring referral order and then disable the DR Target Share.

If both targets are enabled, there is a chance that users start writing into different locations overriding the target priority, this causes DFS Replication service to encounter conflicting data and sharing violations.

DFS05

Disabling one of the folder targets leaves only one target enabled in the namespace ensuring that the users will always hit on that folder target, the other target folder will not have any SMB sessions established from end users.

DFS06

Data availability during disaster:

In ideal working condition, users are always connected to the shared target on production site, the data will be replicated to the shared folder in DR site through DFS-Replication configuration. If the production datacenter is down, the target share in DR site needs to be enabled and whenever users access the folder in the DFS namespace, they will be redirected to the active target share in DR site.

The enabling of standby target share can be automated using File Services Management Pack for Operations Manager to have a smooth and automatic failover of namespace folder. The File Services Management Pack for Operations Manager, monitors the status of production Target Share and through a remediation task, it enables the standby target share automatically.

Following command sets folder targets referral status to “Enabled”

dfsutil.exe property state online “ <UNC of DFS Namespace>”  “<UNC of Shared folder>”

Example: dfsutil.exe property state online “\\acme.com\UserData\Data”  “\\ACME-CAP01-DR\Data”

Converting unsupported scenario to supported scenario:

As per the above mentioned Microsoft support policy for a DFS-R and DFS-N deployment, even if you enable only one folder target at a time, configuring one namespace folder to have multiple folder targets is not supported. In such case, just delete the secondary folder target (do not delete replication) and use dfsutil.exe target add command to create link to the secondary folder target.

Following command adds folder targets to the namespace:

dfsutil.exe target add “ <UNC of DFS Namespace>”  “<UNC of Shared folder>”

Example: dfsutil.exe target add “\\acme.com\UserData\Data”  “\\ACME-CAP01-DR\Data”

As explained earlier, you can use any System Monitoring Solution to automate the above process by configuring auto remediation task.

Removing internal connector from Virtual Machine Manager (VMM) and Operations Manager (SCOM)

Removing  Internal Connectors from Virtual Machine Manager.

While configuring PRO (Performance and Resource Optimization) in Virtual Machine Manager 2012 R2, I encountered and error saying that “A connection already exists”. I was not surprised as I had already tried creating an Operations Manager connector and ended up with a faulty connector.

Connector00

The “remove” and “refresh” options were not active and hence I could not remove the faulty connector.In this situation, the best tool to use is Windows PowerShell. Run PowerShell with administrator privilege and type command Get-SCOpsMgrConnection

Connector01

System will display the available connector. Now type Remove- SCOpsMgrConnection to remove the existing scom connection

Connector02

Removing Unused Internal Connectors from Operations Manager.

Open Operations Manager console and select Internal Connectors from Administration section. A list of all the connectors configured in Operations Manager console is displayed there.

Connector03

Unlike the other configurations, there is no simple option to remove a connector once installed. The graphical user interface does not provide option to remove.

Connector05

The only alternate option is to remove the connectors from Operations Manager Database.

Please note that there is no officially supported way to remove an old connector, this process is demonstrated here for example purpose only. These steps are captured from MS newsgroup posting.

Before proceeding to Operations Manager Database, make sure that all the subscriptions from the connector you wish to remove are deleted.

Connector04

Open Operations Manager Database through SQL Server Management Studio and run following queries:

Select DisplayName,IsInitialized,ConnectorID from Connector,BaseManagedEntity where Connector.BaseManagedEntityID=BaseManagedEntity.BaseManagedEntityID

Connector06

This will return 3 Columns: The Display Name, Initialized Flag, and ConnectorID.

Make sure that the Connector is uninitialized.  If the IsInitialized is 1, then use following command to uninitialized the connector otherwise skip the below step and proceed to delete connector.

EXEC p_ConnectorUpdate ‘<connectorID>’,NULL,0

Cross check the initialize status by rerunning the initial query and ensure that the connector initialized state is now 0

Find the ConnectorID of the connector you want to remove.  Copy the ConnectorID it to Notepad for safekeeping. And then use the p_ConnectorDelete command to delete the connector.

EXEC p_ConnectorDelete ‘<connectorID>’,NULL,NULL

Connector07

Go back to Operations Manager console and select Internal Connectors from Administration section, refresh the screen and notice that information about the removed connector is disappeared from the list.

Repeat this process if you deleted multiple connectors.